拆分子目录到新仓库
场景
通常为便于项目开发和调试,开发前期会将多个组件放在同一仓库中,而当各个组件的功能结构和代码逐渐区域稳定后,
便需要将其拆分出来进行独立开发和管理,以便于与其他项目共享组件。
此时,不仅需要将组件所在目录内的代码全部拆分到单独的仓库,同时,还需要确保历史记录能够完整保留。
操作
1 | # Clone the repository that contains the subfolder. |
注意:
- 在第二步操作后,当前目录将会只剩下子目录中的文件
- 最好在新的目录中进行上述操作:可以直接clone,也可以从复制已有项目到其他目录
若要拆分多个子目录,可通过如下命令筛选出目标目录并保留其历史:
1 | git filter-branch \ |
参考
迁移子分支至新仓库
场景
某个项目仓库中可能存在多个功能特性(features)分支,在一段时候后,基于产品功能规划和开发维护等方面的考虑,
需要将某些特性分支独立成新的项目或子项目,将其迁移到新的仓库中。
操作
1 | # Push 'feature-branch' to the branch 'master' (or others) of new repository |
参考
合并多个仓库到一个仓库
1 | # 分别在各个源仓库中,创建目标目录(即,在合并后的仓库中的目录),再将其全部代码转移到该目录中 |
修改变更提交人的信息
场景
基于项目长远发展考虑,将某个具有实用价值且吸引力极大的项目开源,
需要将项目从公司内部仓库开放到Github上,但相关开发人员在两个系统中所用帐号不一致,
为了便于issue交流以及PR提交,这时,需要更改历史中的提交人信息。
其实,大多数时候,很可能是要弃用内部仓库并将工作全部移到公共仓库时才有这么做的需求,其余情况并不需要这么做。
操作
- 部分替换:
1 | git filter-branch --commit-filter \ |
- 全部替换:
1 | git filter-branch --commit-filter \ |
注意:
- 若出现类似
Cannot create a new backup. A previous backup already exists in refs/original/. Force overwriting the backup with -f的异常提示,则需要在filter-branch命令中添加选项-f,即git filter-branch -f,以强制进行修改 - 如果提交的分支是受保护的,则在提交时会出现
remote: GitLab: You are not allowed to force push code to a protected branch on this project.的错误信息,此时,需要调整仓库设置,临时取消对目标分支的保护
参考
修改历史提交备注信息
场景
在拆分子目录和迁移子分支两个场景中,
在新仓库中的历史提交记录的备注信息可能存在与项目不相关的信息或者包含原始项目中的一些敏感内容。
这个时候,就可能需要修改这些备注信息。
当然,也可能是因为发现以前的提交备注中包含错别字或者表达不清晰,为了避免对其他人产生误导或困惑,
将提交的备注信息予以纠正也是很有必要的。
操作
- 获取提交ID并Rebase到该提交
1 | # List histories and get the commit id which should be modified |
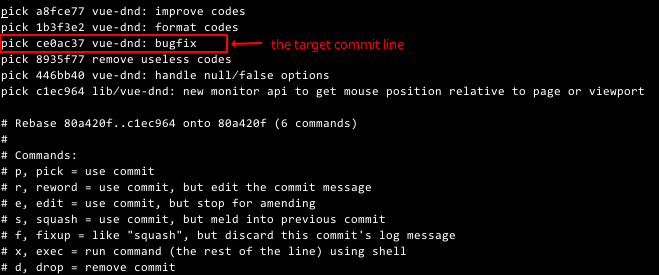
- 将提交所在行开始处的
pick修改为edit
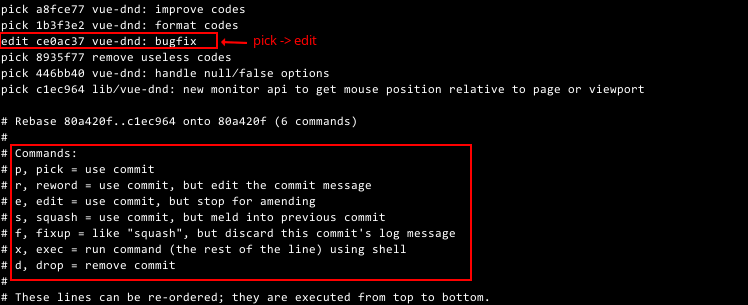
- 提交并应用修改
1 | # New commit message |
注意:
- 如果需要放弃修改,则运行命令
git rebase --abort - 若直接
rebase到目标commit,则该提交不会显示在可修改清单内,故,需选择从其之前的第N个(e.g.~3)提交开始 - 若提交至非空的仓库,需确保目标分支不是受保护(
protected)的 - 在应用修改后,git将从修改位置开始重新构建commit tree,因此,从该位置开始到HEAD的commit id均会发生变化,但原始commit tree依然存在,通过
git diff ce0ac37c83等可看到该提交的变更情况
参考
本博客所有文章除特别声明外,均采用 知识共享署名 4.0 国际许可协议 许可协议。转载请注明来自 flytreeleft's Blog!